
Printing Instructions
Epson Printing (Small Format)
File > Print
Select Printer
epson-1 MATTE (preloaded with matte paper)
epson-2 PHOTO (preloaded with photo paper)
Select Page Setup
Select the correct Paper Size for the document:
8.5” x 11” (Letter)
13” x 19” (super-B)
Select Printer
Select the appropriate Printer Preset
Printer: epson-1 MATTE
Presets: SW Matte (for single-weight matte paper)
Presets: DW Matte (for premium matte paper—double-weight)
Printer: epson-2 PHOTO
Presets: Luster (Luster Photo paper)
Select Print
The printer will automatically pull paper from the correct paper tray.*8.5” x 11” (LETTER)—Bottom Cassette
13” x 19” (SUPER-B)—Top Rear Feed
*You do not need to change the paper in the printer (only refill it)
Double-Sided Printing
You can print double-sided, but only on specific paper that is coated on both sides.
Select the correct paper (Letter or Super-B)
Load the paper in the top paper feed.
Follow these instructions to instruct the printer to print double-sided:
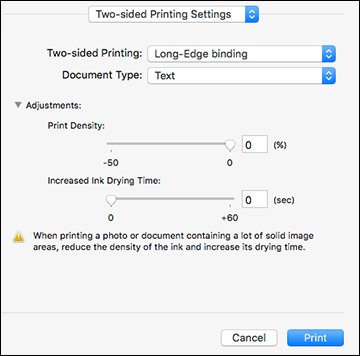
Select the Two-sided Printing options > Turn “On”.
Select the type of document you are printing as the Document Type setting. The software automatically sets the Adjustments options for that document type.
Long-edge is for vertically-oriented printing (like a tall book)
Short-edge binding is for horizontally-oriented printing (like a greeting card)
Paper Types
Presentation Paper Matte (Single Weight) should be used for all designs being printed unless the student requests otherwise.
Premium Presentation Paper Matte (Double-weight) is the cover stock paper used when required for a project.
This paper is more expensive and should only be used when required.
Double-sided Premium Presentation Paper is available to use for brochures, greeting cards, etc.
Follow the instructions below to print double-sided on the Epson Expression Printers (small-format).
Ultra Luster Paper should be used for all photographs.
Letter-size paper is supplied for smaller prints (8” x 10”).
The larger sheets of 13” x 19” (Super-B) should only be used when larger prints are requested.
File Requirements
Do you print from a PDF or the native program (Illustrator, Photoshop, InDesign)?
Typically we have employees print PDFs in Adobe Acrobat (not Preview) because PDF package the assets in a way that doesn’t require you to have fonts or links required to print correctly from the native programs.
You may print from the native programs if you have all the required files to open it correctly.
What type of file do we need to print?
PDF (most Graphic Design)
JPG or TIFF (Photographs)


How to Print from Adobe Acrobat
Can you print Crop marks?
If a student has a bleed set for their document, they probably want crop marks printed as well. However, the student must export their document (from Illustrator, InDesign, Photoshop) with crop marks to have them in the right place.
Employees can not easily make crop marks appear in the right place when there is a bleed set for the document.
Create a print-ready PDF with bleeds inside Photoshop (Video tutorial)
Create a print-ready PDF with bleeds inside Illustrator (Video Tutorial)